


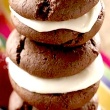


THE BEST DOUBLE CHOCOLATE CHOCOLATE CAKE
1 3/4 cup flour
1/4 cup unsweetened cocoa powder
1/2 tsp baking soda
1/4 tsp salt
8 squares (1 ounce each) Baker semi-sweet chocolate
2 sticks (1 cup) butter
1 3/4 cup sugar
3 large eggs
3/4 cup whole milk or buttermilk (I used the milk)
1 tsp vanilla
1 or 2 tbsp oil (optional) (I did not use it)
Heat oven to 325 degrees F. Grease 2 (I needed 3) 9-inch round pans with some butter...I used the squeeze kind because it was easier and less messy.
Sift flour, cocoa powder, baking soda, and salt together (easy way...put all of them in a bowl and use a wire whisk)
Melt 8 squares of chocolate and 2 sticks of butter together in bowl over boiling water over low low heat stirring occasionally to prevent anything bad from happening (you can use the microwave but I think chocolate tastes better when melted in the double boiler...it also tends to keep its shiny this way).
While that's working... In a large bowl beat sugar and eggs with an electric mixer on medium speed for 2 minutes (keep the mixer in the bowl).
Add the chocolate and butter mixture, mixing it well with mixer. Gradually add flour mixture beating well after each addition. Mixture will be thick...Do not give up with the mixer...LOL. Add milk or buttermilk (whichever you choose) and vanilla and oil (if you choose) again mixing really well.
PUT A SMALL OVEN PROOF DISH WITH WARM WATER IN THE OVEN WHILE BAKING FOR EXTRA MOISTURE.
Pour into prepared pans and bake 30 to 40 minutes (I started the timer out at 20 and worked my way up). When moist looking crumbs come out when tested, take them out of the oven and not a moment longer. Cool 10 minutes in pans and remove to rack or however you do it to cool completely...
The edges may be crunchy and there also may be a crunchy top layers. I also noticed they may seem stiff...Do not be deterred they are playing tricks on you...LOL...Inside they are amazing.
That being said, when they are cooled completely, using a good sharp knife, stack them all together and carefully saw the hard crunchy edges off going around the cake like an octagon of sorts....just the edges though.
Then you will need 1 container of whipped buttercream icing and 2 containers of milk chocolate icing (you can make both homemade if you choose...just easier to use the already made kind.) Ice the middle layers with buttercream and the outside with chocolate...and then try not to die when you eat it...LOL
- Post Reply
- Post New
- Save to Recipe Box
ADVERTISEMENT
Random Recipes from:
Desserts - Cakes
Desserts - Cakes
- Chocolate Cake with Orange Frosting
- Glazed Pistachio Rum Cake and Harvest Cake with Pistachios and Orange Icing (without pudding mix)
- Honey-Cinnamon Tres Leches Cake with Whipped Cream Frosting
- Wiki Wiki Coconut Cake (using cake mix)
- Apricot 100 Hole Cake with Lemon Glaze (using cake mix and apricot nectar)
- Chocolate Angel Food Cake (using angel food cake mix)
- Cheese-Filled Rhubarb Coffeecake
- Lazy Daisy Spice Cake with Caramel Coconut Topping (1960's)
- Fiesta Banana Cake recipes (4)
- Starlight Cake - uses shortening (Betty Crocker Cookbook - 1950's)
UPLOAD AN IMAGE
Allowed file types: .gif .png .jpg .jpeg
Allowed file types: .gif .png .jpg .jpeg
POST A REPLY
Post a Request - Answer a Question
Share a Recipe
Thank You To All Who Contribute
Post a Request - Answer a Question
Share a Recipe
Thank You To All Who Contribute
POST A NEW MESSAGE
Post a Request - Answer a Question
Share a Recipe
Thank You To All Who Contribute
Post a Request - Answer a Question
Share a Recipe
Thank You To All Who Contribute