


Hello Moti - here is the recipe from one of my favorite bread websites, www.kingarthurflour.com. I hope you enjoy!
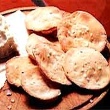
Pita
0.5 litres/2 cups warm water
1 tablespoon (60 ml) sugar
1 packet (approx. 7 grams) or scant tablespoon
active dry yeast
5 1/2 (approx. 1.25 kg) to 6 1/2 (1.5 kg)cups
Unbleached All-Purpose Flour
1 scant tablespoon (60 ml) salt
Pitas are best made ahead of time so they'll have a chance to cool and deflate before you fill them.
If you work away from home during the day or even if you work at home, you can make up a sponge with about half the flour. The easiest way to make up a is to make a sponge. Putting a sponge together takes almost no time at all, and because it will work for several hours on its own, it produces unequalled flavor in the finished product. (You can use this method to make any bread, which makes it possible for anyone who has to be away during the day to make their own unsurpassable homemade bread, focaccia, pizza, sticky buns, on ad infinitum.)
In the morning before you go off about your day, stir together in a mixing bowl the water, sugar, yeast, and enough unbleached flour to make about 1 cup of flour altogether. After 5 minutes or so, give this brew another stir to make sure the yeast is well dissolved and distributed. Then cover it with plastic wrap and let this sponge go to work.
When you get back to the sponge later on, add the salt and enough flour to make a dough that is a bit stiffer than that for a focaccia, one that you can easily knead by hand.
Turn the dough out of the bowl onto a floured surface and knead it until it is smooth and bouncy, adding only enough more flour to keep it from sticking to the board or you. Give it a rest for about 5 minutes to relax the gluten and make it more cooperative about being shaped.
Divide the dough into 8 pieces. Flatten each piece with your hand and then roll each piece with a floured rolling pin, or a pin with a cover, on a floured surface into a circle about 6 inches in diameter and 1/8-inch thick. You may need to let the pieces rest occasionally to relax the dough.
Sprinkle baking sheets with cornmeal and place two circles on each. Or place circles on pieces of parchment paper. Let the dough circles rest here for at least 15 minutes while you preheat your oven to a hot 500 F/260C.
When the pita circles have finished resting, place the baking sheet on the oven bottom or, if this is not possible, on the lowest rack. If you're using a baking stone, make sure it's on the oven floor, or on the lowest rack. Use a peel to transfer the pitas-on-parchment to the stone. Close the oven door and keep it shut for 1 minute. Don't peek or the pocket may not form. It's this initially fast, hot searing of the outside dough of the pita that makes it separate from the inside. The carbon dioxide gas created by the yeast expands inside and accentuates the separation until the pita blows up like a balloon and the pocket is created.
At the end of the minute, place the sheet on a rack higher in the oven and continue baking anywhere from 3 to 7 minutes, until the pitas have blown up into balloons and are lightly browned. If the pitas baked right on the stone, you'll probably want to transfer them to a baking sheet, which is already in place on the oven rack, for this second part of their baking. When they're done, remove the baking sheet from the oven, slide the pitas off and let them cool. They will probably deflate somewhat after cooling. Once they're thoroughly cool you can press more air out of them so they take up less storage room.
MsgID: 0054176
Shared by: Terrie, MD
In reply to: ISO: pocket pitta bread
Board: Cooking Club at Recipelink.com
Shared by: Terrie, MD
In reply to: ISO: pocket pitta bread
Board: Cooking Club at Recipelink.com
- Read Replies (2)
- Post Reply
- Post New
- Save to Recipe Box
| Reviews and Replies: | |
| 1 | ISO: pocket pitta bread |
| moti liran slovakia | |
| 2 | Recipe(tried): Pita bread |
| Terrie, MD | |
| 3 | Recipe: Whole Wheat Pita Pockets |
| Betsy at TKL | |
ADVERTISEMENT
Random Recipes from:
Breads - Assorted
Breads - Assorted
- Mile High Popovers with 5 Variations (and make ahead tip)
- Seamen's Inn Restaurant Corn Puff Popovers (1980's)
- Sour Cream, Orange and Lavender (or Rosemary) Biscuits
- Not your average pumpkin bread
- Cornmeal Dumplings
- Melt-In-Your-Mouth Pumpkin Biscuits
- Sour Cream and Chives Biscuits (using biscuit mix)
- Popeye's Biscuits (repost)
- Popovers and Cheese Popovers (Oster blender recipe, 1950's)
- Reasons For Popover Failures
UPLOAD AN IMAGE
Allowed file types: .gif .png .jpg .jpeg
Allowed file types: .gif .png .jpg .jpeg
POST A REPLY
Post a Request - Answer a Question
Share a Recipe
Thank You To All Who Contribute
Post a Request - Answer a Question
Share a Recipe
Thank You To All Who Contribute
POST A NEW MESSAGE
Post a Request - Answer a Question
Share a Recipe
Thank You To All Who Contribute
Post a Request - Answer a Question
Share a Recipe
Thank You To All Who Contribute