


Maple Oatmeal Bread (bread machine dough cycle)
rec.food.cooking/Dan Schwarcz (1995)
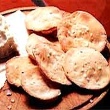
Maple Oatmeal Bread - my favorite bread recipe!
I got this from a cookbook provided with my DAK breadmaker, and I've made it more often than all other bread recipes from any source added together. It makes a slightly sweet, very tasty bread that can be sliced very thin without crumbling. But I usually slice it thick and devour! Makes good toast, great sandwiches, and freezes well. And boy does it smell great while baking!
The recipe calls for quick-cooking oats, which are apparently cut finer than regular rolled oats. I've used both types, and both come out fine. However, I do one thing that may hide a difference: I toss the ingredients into my breadmaker in the morning, and set the timer to prepare the dough (manual mode) in the evening. So my oats are wet or damp for a long time, and maybe if I didn't do that the rolled oats wouldn't dissolve completely. I dunno. Another thing I usually do is give it a little bit of extra kneading after the cycle ends, so it is easier to handle when I take it out of the breadmaker and put it in a loaf pan for a final rise and baking. This may or may not also hide some advantage to using quick oats.
In any event, back when I didn't mind the results from cooking the bread in the breadmaker, this bread was *also* my favorite from the machine. Not as good as baked in an oven, but as good as breadmaker bread ever got.
I'll include some details on baking manually that I was taught by Katerine Kirk, and the adjustment for non-DAK/Welbilt machines is based on the way such adjustments are done in the Bread Machine Magic cookbook.
For fat-free bread, leave out the oil. The bread will be almost identical, but will not last quite as long. It's not a lot of oil either way.
MAPLE OATMEAL BREAD (bread machine recipe)
1 package active dry yeast (2 1/4 teaspoons)
1 cup quick cooking oats
3 cups bread flour (I use unbleached all-purpose flour, and add 1 tbsp vital gluten)
1 teaspoon salt (I use 1 tablespoon Kosher salt - same quantity of salt, since it is so much coarser, but without added iodine.)
1/3 cup maple syrup (Substitutions don't work. It's gotta be pure maple.)
1 tablespoon cooking oil
1 1/4 cups plus 1 tablespoon very warm water
(I use cold water from the tap, hit "start" to mix the bread dough, so I can see how the dough looks. I add a little flour or water as needed, then hit "cancel" and set the timer to start again much later, so that the dough is ready when I come home from work. If you're preparing the bread without such a delay, use water that's very warm but not hot; I use cold water from the tap which I heat in the microwave and test by sticking my finger in it. NEVER use hot water from the tap for cooking - it picks up contaminants from the piping.)
- If using a machine other than the DAK/Welbilt models, use only 1 cup, 1 ounce and 1 tablespoon of water (2 tablespoons less water.)
If not baking in the breadmaker, set to "manual".
When the machine says the dough is ready, hit "start" and let the dough get kneaded for a minute or two so that it is easy to handle.
Remove bread pan from machine. In a DAK/Welbilt model, twist off and remove
the kneading pin. Turn pan upside down over a greased loaf pan. When the dough falls out, remove the kneading paddle and using your fists, push the dough down to fill the bottom of the pan.
Now, Katerine told me she covers the bread with a "tea towel" saturated with flour. When she described what a tea towel was like, I realized that in this side of the ocean a standard men's handkerchief, well-washed, would serve the same purpose. I keep one in a big jar with about an inch of flour at the bottom, and when I bake bread I just shake the jar, and remove the hankerchief and shake it gently to remove excess flour that can cake on. I fold it in half, then drape it over the bread, pushing lightly so it just touches the dough without pressing it down. I do this over some easy-to-clean surface so the dropped flour isn't a problem (for example, a big aluminum roaster).
Then I leave the dough somewhere warm - usually my gas oven, which is kept off - for as long as it takes to rise to about 3/4-inch of the top of the pan. When it's risen enough - usually about 45 minutes - I lift off the "tea towel" (and put it back in the jar - nothing ever sticks to it!) and turn the oven on to 375 F.
Usually I've had the pan sitting on a big aluminum roasting pan to catch any flour from the towel - I hate cleanup - so I now shake the flour off the big roaster and give it a quick rinse. Then I get a sharp, *serrated* knife and I make three diagonal slices across the bread, about 1/4-inch deep or more. Hopefully (but not always) these will prevent the bread from splitting along the side when it bakes. It's mostly a cosmetic issue.
Return the bread to the oven (I don't bother waiting for it to reach 375 F) and bake for about 40 minutes, until the bread sounds hollow when I *thump* it with a knife handle.
I remove it from the oven, and pop it out of the loaf pan and let it cool on a wire rack, first *thumping* it again from below to make sure it's done.
Don't slice until it has cooled completely!!! At that point, we tend to dig in and attack it like ravenous wolves, and whatever isn't eaten within a day or two gets sliced up and wrapped in plastic in two-slice servings and frozen.
rec.food.cooking/Dan Schwarcz (1995)
Maple Oatmeal Bread - my favorite bread recipe!
I got this from a cookbook provided with my DAK breadmaker, and I've made it more often than all other bread recipes from any source added together. It makes a slightly sweet, very tasty bread that can be sliced very thin without crumbling. But I usually slice it thick and devour! Makes good toast, great sandwiches, and freezes well. And boy does it smell great while baking!
The recipe calls for quick-cooking oats, which are apparently cut finer than regular rolled oats. I've used both types, and both come out fine. However, I do one thing that may hide a difference: I toss the ingredients into my breadmaker in the morning, and set the timer to prepare the dough (manual mode) in the evening. So my oats are wet or damp for a long time, and maybe if I didn't do that the rolled oats wouldn't dissolve completely. I dunno. Another thing I usually do is give it a little bit of extra kneading after the cycle ends, so it is easier to handle when I take it out of the breadmaker and put it in a loaf pan for a final rise and baking. This may or may not also hide some advantage to using quick oats.
In any event, back when I didn't mind the results from cooking the bread in the breadmaker, this bread was *also* my favorite from the machine. Not as good as baked in an oven, but as good as breadmaker bread ever got.
I'll include some details on baking manually that I was taught by Katerine Kirk, and the adjustment for non-DAK/Welbilt machines is based on the way such adjustments are done in the Bread Machine Magic cookbook.
For fat-free bread, leave out the oil. The bread will be almost identical, but will not last quite as long. It's not a lot of oil either way.
MAPLE OATMEAL BREAD (bread machine recipe)
1 package active dry yeast (2 1/4 teaspoons)
1 cup quick cooking oats
3 cups bread flour (I use unbleached all-purpose flour, and add 1 tbsp vital gluten)
1 teaspoon salt (I use 1 tablespoon Kosher salt - same quantity of salt, since it is so much coarser, but without added iodine.)
1/3 cup maple syrup (Substitutions don't work. It's gotta be pure maple.)
1 tablespoon cooking oil
1 1/4 cups plus 1 tablespoon very warm water
(I use cold water from the tap, hit "start" to mix the bread dough, so I can see how the dough looks. I add a little flour or water as needed, then hit "cancel" and set the timer to start again much later, so that the dough is ready when I come home from work. If you're preparing the bread without such a delay, use water that's very warm but not hot; I use cold water from the tap which I heat in the microwave and test by sticking my finger in it. NEVER use hot water from the tap for cooking - it picks up contaminants from the piping.)
- If using a machine other than the DAK/Welbilt models, use only 1 cup, 1 ounce and 1 tablespoon of water (2 tablespoons less water.)
If not baking in the breadmaker, set to "manual".
When the machine says the dough is ready, hit "start" and let the dough get kneaded for a minute or two so that it is easy to handle.
Remove bread pan from machine. In a DAK/Welbilt model, twist off and remove
the kneading pin. Turn pan upside down over a greased loaf pan. When the dough falls out, remove the kneading paddle and using your fists, push the dough down to fill the bottom of the pan.
Now, Katerine told me she covers the bread with a "tea towel" saturated with flour. When she described what a tea towel was like, I realized that in this side of the ocean a standard men's handkerchief, well-washed, would serve the same purpose. I keep one in a big jar with about an inch of flour at the bottom, and when I bake bread I just shake the jar, and remove the hankerchief and shake it gently to remove excess flour that can cake on. I fold it in half, then drape it over the bread, pushing lightly so it just touches the dough without pressing it down. I do this over some easy-to-clean surface so the dropped flour isn't a problem (for example, a big aluminum roaster).
Then I leave the dough somewhere warm - usually my gas oven, which is kept off - for as long as it takes to rise to about 3/4-inch of the top of the pan. When it's risen enough - usually about 45 minutes - I lift off the "tea towel" (and put it back in the jar - nothing ever sticks to it!) and turn the oven on to 375 F.
Usually I've had the pan sitting on a big aluminum roasting pan to catch any flour from the towel - I hate cleanup - so I now shake the flour off the big roaster and give it a quick rinse. Then I get a sharp, *serrated* knife and I make three diagonal slices across the bread, about 1/4-inch deep or more. Hopefully (but not always) these will prevent the bread from splitting along the side when it bakes. It's mostly a cosmetic issue.
Return the bread to the oven (I don't bother waiting for it to reach 375 F) and bake for about 40 minutes, until the bread sounds hollow when I *thump* it with a knife handle.
I remove it from the oven, and pop it out of the loaf pan and let it cool on a wire rack, first *thumping* it again from below to make sure it's done.
Don't slice until it has cooled completely!!! At that point, we tend to dig in and attack it like ravenous wolves, and whatever isn't eaten within a day or two gets sliced up and wrapped in plastic in two-slice servings and frozen.
MsgID: 318999
Shared by: Betsy at TKL
In reply to: Recipe: Bread Machine Recipes (29) 2002-02-27
Board: Daily Recipe Swap at Recipelink.com
Shared by: Betsy at TKL
In reply to: Recipe: Bread Machine Recipes (29) 2002-02-27
Board: Daily Recipe Swap at Recipelink.com
- Read Replies (46)
- Post Reply
- Post New
- Save to Recipe Box
ADVERTISEMENT
Random Recipes from:
Breads - Assorted
Breads - Assorted
- Savory Herbed Shortbread (food processor)
- Danish Flatbread
- Homemade Plain Soda Crackers and Variations (sesame, herb, poppy, caraway)
- Drop Biscuits with Green Onions (Melissa D'Arabian)
- Ukrainian Rich Basic Sweet Dough (Osnovne Solodke Tisto)
- Mayonnaise Rolls
- Parmesan and Oregano Bundt Bread (using refrigerated biscuit dough)
- Irish Soda Bread (Marion Cunningham)
- German Almond Bread (using Grape-Nuts cereal and almond paste)
- Blueberry Oatmeal Drop Biscuits
UPLOAD AN IMAGE
Allowed file types: .gif .png .jpg .jpeg
Allowed file types: .gif .png .jpg .jpeg
POST A REPLY
Post a Request - Answer a Question
Share a Recipe
Thank You To All Who Contribute
Post a Request - Answer a Question
Share a Recipe
Thank You To All Who Contribute
POST A NEW MESSAGE
Post a Request - Answer a Question
Share a Recipe
Thank You To All Who Contribute
Post a Request - Answer a Question
Share a Recipe
Thank You To All Who Contribute