


EASY BUTTERMILK POT BREAD WITH COARSE SALT
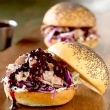
"Puffy, and crusty, and faintly tangy, this big, craggy-topped loaf is such good eating it may become a standard in your repertoire. Since the dough is baked in a lidded Dutch oven, it usually springs up a lot and is light and airy. The acid in the buttermilk also makes the crumb moist and tender. Sprinkling the top with coarse salt is a contemporary touch that I think adds to the appeal, but feel free to omit it if you prefer a more old-fashioned loaf. Buttermilk breads have been popular with American home bakers for decades, not only because these loaves are tasty and fuss-free, but also because in the past they used up leftover buttermilk. When families still churned their own butter, buttermilk was the butter-flecked liquid remaining after the fat separated out from the cream and formed butter."

Kneadlessly Simple Quotient - Easy: Fuss-free ingredients; two-stage mixing. No hand-shaping.
4 cups (20 ounces) unbleached white bread flour or unbleached all-purpose white flour, plus 1⁄2 cup (2.5 ounces), plus more as needed
2 tablespoons granulated sugar
Scant 1 3⁄4 teaspoons table salt (increase to 2 teaspoons if coarse salt garnish is omitted)
3⁄4 teaspoon instant, fast-rising, or bread machine yeast
Corn oil, canola oil, or other flavorless vegetable oil for coating dough
1 3⁄4 cups plus 2 tablespoons ice water, plus more if needed
1⁄3 cup dried buttermilk powder
2 tablespoons unsalted butter, melted and cooled slightly
3⁄4 teaspoon coarse crystal salt for garnish, optional
FIRST MIXING:
In a large bowl, thoroughly stir together 4 cups of the flour, the sugar, salt, and yeast. Thoroughly stir the water into the bowl, scraping down the sides until the ingredients are thoroughly blended. If the mixture is too dry to incorporate all the flour, a bit at a time, stir in just enough more ice water to blend the ingredients; don't over-moisten, as the dough should be slightly stiff. If it is very soft, stir in enough flour to firm it slightly.
FIRST RISE:
Brush or spray the top with oil. Cover the bowl with plastic wrap and let rise at room temperature for 1 1/2 to 2 1/2 hours. If desired, for best flavor or for convenience, you can refrigerate the dough for 3 to 10 hours. Then let rise at cool room temperature for 12 to 18 hours.
SECOND MIXING:
Vigorously stir the buttermilk powder and butter into the dough until evenly and thoroughly incorporated. (Or use a dough hook and heavy-duty mixer on low speed, if desired.) Then, thoroughly incorporate the remaining 1/2 cup flour, plus enough more to make the dough very stiff. Scrape down the bowl sides thoroughly. Using an oiled rubber spatula, lift and fold the dough in towards the center all the way around.
SECOND RISE:
Evenly brush or spray the dough top with oil. Cover the bowl with nonstick spray-coated plastic wrap.
THEN, LET RISE USING ANY OF THESE METHODS:
For a 1 1/2- to 2 1/2-hour regular rise, let stand at warm room temperature; for a 1- to 2-hour accelerated rise, let stand in a turned-off microwave along with 1 cup of boiling-hot water; or for an extended rise, refrigerate for 4 to 24 hours, then set out at room temperature. Continue the rise until the dough doubles from its original size, removing the plastic if the dough nears it.
BAKING PRELIMINARIES:
Twenty minutes before baking time, put a rack in the lower third of the oven; preheat to 450 degrees F. Heat a 4-quart Dutch oven or similar heavy metal pot in the oven until sizzling hot (check with a few drops of water), then remove it, using heavy mitts.
Taking care not to deflate the dough (or burn yourself), loosen it from the bowl sides with an oiled rubber spatula and gently invert it into the pot. Don't worry if it's lopsided and ragged-looking; it will even out during baking. Lightly spritz or brush the dough top with water. Then evenly sprinkle over the coarse salt. Slash a large, 1/4-inch-deep in the dough top with well-oiled kitchen shears. Immediately top the pot with the lid. Shake the pot back and forth to center the dough.
BAKING:
Lower the heat to 425 degrees F. Bake on the lower rack for 50 to 55 minutes or until puffed and firm on top. If the loaf is nicely browned, continue baking with the lid on; if the loaf looks pale, remove the lid. Bake for 10 to 15 minutes longer, until the top is well browned and crusty and a skewer inserted in the thickest part comes out with just a few crumbs on the tip (or until center registers 205 to 207 degrees F on an instant-read thermometer). Then, bake for 5 to 10 minutes longer to ensure the center is baked through. Cool in the pan on a wire rack for 10 to 15 minutes. Remove the loaf to the rack. Cool thoroughly.
SERVING AND STORING:
Cut the loaf into wedges or crosswise slices; it tastes good warm, but will cut much better when cool. Cool completely before storing.
To maintain the crisp crust, store draped with a clean tea towel or in a heavy paper bag. Or store airtight in a plastic bag or wrapped in foil: The crust will soften, but can be crisped by heating the loaf, uncovered, in a 400 degrees F oven for a few minutes.
The bread will keep at room temperature for 3 days, and may be frozen, airtight, for up to 2 months.
Makes 1 large loaf, 12 to 14 wedges or slices
Adapted from source: Kneadlessly Simple: Fabulous, Fuss-Free, No-Knead Breads by Nancy Baggett
"Puffy, and crusty, and faintly tangy, this big, craggy-topped loaf is such good eating it may become a standard in your repertoire. Since the dough is baked in a lidded Dutch oven, it usually springs up a lot and is light and airy. The acid in the buttermilk also makes the crumb moist and tender. Sprinkling the top with coarse salt is a contemporary touch that I think adds to the appeal, but feel free to omit it if you prefer a more old-fashioned loaf. Buttermilk breads have been popular with American home bakers for decades, not only because these loaves are tasty and fuss-free, but also because in the past they used up leftover buttermilk. When families still churned their own butter, buttermilk was the butter-flecked liquid remaining after the fat separated out from the cream and formed butter."
Kneadlessly Simple Quotient - Easy: Fuss-free ingredients; two-stage mixing. No hand-shaping.
4 cups (20 ounces) unbleached white bread flour or unbleached all-purpose white flour, plus 1⁄2 cup (2.5 ounces), plus more as needed
2 tablespoons granulated sugar
Scant 1 3⁄4 teaspoons table salt (increase to 2 teaspoons if coarse salt garnish is omitted)
3⁄4 teaspoon instant, fast-rising, or bread machine yeast
Corn oil, canola oil, or other flavorless vegetable oil for coating dough
1 3⁄4 cups plus 2 tablespoons ice water, plus more if needed
1⁄3 cup dried buttermilk powder
2 tablespoons unsalted butter, melted and cooled slightly
3⁄4 teaspoon coarse crystal salt for garnish, optional
FIRST MIXING:
In a large bowl, thoroughly stir together 4 cups of the flour, the sugar, salt, and yeast. Thoroughly stir the water into the bowl, scraping down the sides until the ingredients are thoroughly blended. If the mixture is too dry to incorporate all the flour, a bit at a time, stir in just enough more ice water to blend the ingredients; don't over-moisten, as the dough should be slightly stiff. If it is very soft, stir in enough flour to firm it slightly.
FIRST RISE:
Brush or spray the top with oil. Cover the bowl with plastic wrap and let rise at room temperature for 1 1/2 to 2 1/2 hours. If desired, for best flavor or for convenience, you can refrigerate the dough for 3 to 10 hours. Then let rise at cool room temperature for 12 to 18 hours.
SECOND MIXING:
Vigorously stir the buttermilk powder and butter into the dough until evenly and thoroughly incorporated. (Or use a dough hook and heavy-duty mixer on low speed, if desired.) Then, thoroughly incorporate the remaining 1/2 cup flour, plus enough more to make the dough very stiff. Scrape down the bowl sides thoroughly. Using an oiled rubber spatula, lift and fold the dough in towards the center all the way around.
SECOND RISE:
Evenly brush or spray the dough top with oil. Cover the bowl with nonstick spray-coated plastic wrap.
THEN, LET RISE USING ANY OF THESE METHODS:
For a 1 1/2- to 2 1/2-hour regular rise, let stand at warm room temperature; for a 1- to 2-hour accelerated rise, let stand in a turned-off microwave along with 1 cup of boiling-hot water; or for an extended rise, refrigerate for 4 to 24 hours, then set out at room temperature. Continue the rise until the dough doubles from its original size, removing the plastic if the dough nears it.
BAKING PRELIMINARIES:
Twenty minutes before baking time, put a rack in the lower third of the oven; preheat to 450 degrees F. Heat a 4-quart Dutch oven or similar heavy metal pot in the oven until sizzling hot (check with a few drops of water), then remove it, using heavy mitts.
Taking care not to deflate the dough (or burn yourself), loosen it from the bowl sides with an oiled rubber spatula and gently invert it into the pot. Don't worry if it's lopsided and ragged-looking; it will even out during baking. Lightly spritz or brush the dough top with water. Then evenly sprinkle over the coarse salt. Slash a large, 1/4-inch-deep in the dough top with well-oiled kitchen shears. Immediately top the pot with the lid. Shake the pot back and forth to center the dough.
BAKING:
Lower the heat to 425 degrees F. Bake on the lower rack for 50 to 55 minutes or until puffed and firm on top. If the loaf is nicely browned, continue baking with the lid on; if the loaf looks pale, remove the lid. Bake for 10 to 15 minutes longer, until the top is well browned and crusty and a skewer inserted in the thickest part comes out with just a few crumbs on the tip (or until center registers 205 to 207 degrees F on an instant-read thermometer). Then, bake for 5 to 10 minutes longer to ensure the center is baked through. Cool in the pan on a wire rack for 10 to 15 minutes. Remove the loaf to the rack. Cool thoroughly.
SERVING AND STORING:
Cut the loaf into wedges or crosswise slices; it tastes good warm, but will cut much better when cool. Cool completely before storing.
To maintain the crisp crust, store draped with a clean tea towel or in a heavy paper bag. Or store airtight in a plastic bag or wrapped in foil: The crust will soften, but can be crisped by heating the loaf, uncovered, in a 400 degrees F oven for a few minutes.
The bread will keep at room temperature for 3 days, and may be frozen, airtight, for up to 2 months.
Makes 1 large loaf, 12 to 14 wedges or slices
Adapted from source: Kneadlessly Simple: Fabulous, Fuss-Free, No-Knead Breads by Nancy Baggett
- Post Reply
- Post New
- Save to Recipe Box
ADVERTISEMENT
Random Recipes from:
Breads - Yeast Breads
Breads - Yeast Breads
- Basic Quick-Do Rolls (Arm & Hammer Baking Soda, 1949)
- Pyrex Bake-A-Round Dark Rye Bread
- Golden Gate Snack Bread - Pillsbury bakeoff winning recipe (1960's)
- Homemade Milk Bread (Betty Crocker cookbook)
- Batter Oatmeal Bread (yeast bread, Panasonic blender cookbook, 1970's)
- Ice-Box Rolls (Household Searchlight, 1941)
- Streamlined White Bread (Gold Medal Flour)
- Getting seeds stick on seeded buns
- Croissants - Classic French Recipe, Easy Croissants, and Bread Machine Croissants (repost)
- Bohemian Kolachy or Sweet Rolls (using yeast)
UPLOAD AN IMAGE
Allowed file types: .gif .png .jpg .jpeg
Allowed file types: .gif .png .jpg .jpeg
POST A REPLY
Post a Request - Answer a Question
Share a Recipe
Thank You To All Who Contribute
Post a Request - Answer a Question
Share a Recipe
Thank You To All Who Contribute
POST A NEW MESSAGE
Post a Request - Answer a Question
Share a Recipe
Thank You To All Who Contribute
Post a Request - Answer a Question
Share a Recipe
Thank You To All Who Contribute