


Recipe: Shrimp Finger Sushi and How to Make Sushi Rice
Appetizers and SnacksSHRIMP FINGER SUSHI

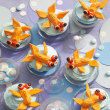
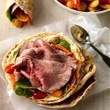
"Shrimp Finger Sushi (ebi no nigiri-zushi) is a beloved sushi bar staple. That's why we include it in the "Creating Sushi Bar Favorites at Home" Chapter of Sushi for Dummies.
If you're in a hurry and don't want to make sushi rice yourself, you can use the microwaveable, individually packaged versions of cooked Japanese (short-grained) rice labeled gohan. We've seen this precooked rice only in Asian markets, but it likely will be widely available soon. Simply follow the reheating directions on the package and then scale down the dressing to match the amount of rice you're making. The trick to pleasantly chewy, but not tough, boiled shrimp is boiling them just long enough to cook through, no more. Threading a skewer into the shrimp insures they cook straight."
1 cup prepared Sushi Rice (recipe follows)
8 jumbo shrimp
1/2 teaspoon Wasabi paste, or to taste
Special Sushi Tools 6- to 7-inch bamboo skewers
FOR SERVING:
Pickled ginger
Soy sauce
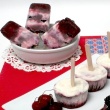
Prepare 8 finger sushi rice balls using the sushi rice. To do this, dip your hands in a bowl of vinegared water (4 tablespoons rice wine vinegar to 1 cup water), tap them on a damp towel to remove excess water, pick up and gently squeeze about 2 tablespoons sushi rice into a slender oval ball, about 2-inches long x 1-inch wide, using the palms and fingers of one hand, aided by the other hand if necessary. Gently press the bottom of the finger sushi with your thumb to give it a slightly humped look and place the finger sushi on a damp cutting board or plate. Continue making sushi rice balls for the eight finger sushi, rewetting your fingers as necessary and placing the sushi on the damp cutting board or plate. Set aside, covered, in a cool place.
Run a bamboo skewer through each shrimp from the head to the tail end, coming in just under the bottom shell. Cook them in boiling salted water about 3 minutes, just until cooked through. Immediately plunge them into ice water to stop the cooking. Drain and dry the shrimp. Twist the skewers out of the shrimp, and peel off the shells. Butterfly each shrimp from the head down to, but not through, the tail. Remove any dark vein, if present.
Dab wasabi paste, to taste, on the top of the rice balls. Drape a butterflied shrimp over the top of each sushi rice ball. Give them a finished look by laying a damp paper towel over the shrimp, gently pressing the shrimp and rice ball together. Serve with soy sauce and pickled ginger.
Makes 8 finger sushi
HOW TO MAKE SUSHI RICE
This sushi rice recipe is adapted from a recipe by Mineko Takane Moreno.
Makes 5 cups cooked and seasoned rice
Sushi rice takes about 1 1/2 hours to make, the majority of the time letting the rice soak or cook. If you're working the day you want to eat sushi, make the rice early in the morning, then set it aside until suppertime. Sushi rice is best eaten the day it's made, or it looses it's fresh, bright flavor.
You'll need a large, wide-mouthed and shallow non-reactive container like a wooden salad bowl to cool down and season the sushi rice in; a flat wooden rice paddle, or wooden spoon to turn over the hot rice; and a fan, or something stiff and flat, to fan off and help cool down the hot rice quickly. Important tip for last-minute sushi: Any sushi rice not eaten that day can be frozen in one cup flat-patty portions, sealed tightly in plastic wrap. Place them in freezer bags for extra protection. Perforate the plastic wrap, then microwave each portion about 2 minutes to refresh them. Use these frozen patties within 2 to 3 months.
FOR THE VINEGAR DRESSING:
1/4 cup rice vinegar
1 tablespoon sugar
1 1/2 teaspoons salt
FOR THE SUSHI RICE:
2 cups uncooked short or medium grain white rice (Arborio rice cooks up too creamy, long grain rice too dry for sushi)
2 cups water
1 (2- to 3- inch) square piece of dashi konbu (dried kelp), wiped with a damp cloth, cut a few times along the edges
1 tablespoons sake (rice wine)
TO MAKE THE VINEGAR DRESSING:
Before the rice is cooked, combine the ingredients for the Vinegar Dressing in a small bowl, stirring a minute or two until the salt and sugar dissolve. Set aside.
TO PREPARE THE SUSHI RICE:
Place the rice in a large bowl or pan. Cover the rice well with cold tap water. Gently swirl the rice around in the bowl 5 seconds or so using your hand. Wait a second or two until the rice settles down, then pour off the milky-colored water. (Never let the rice soak in this milky water or the rice will take on an off-flavor.) Rinse the rice again, in the same fashion, 3 or 4 more times, until the water is almost clear. Drain the rice a final time.
Combine the rinsed rice with 2 cups water in a rice cooker (don't plug it in yet) or a heavy pot. In either case, the water should be about 1/2-inch above the rice. (If your first batch of sushi rice made from a new bag of rice is a little dry, add 1/4 cup more water next time.) Let the rice soak for 30 minutes, then add the dashi konbu and sake. If using a rice cooker, plug it in and turn it on. The rice cooker will take it from there, turning off, or down, at the appropriate time. If using a heavy pot (at least 1 1/2 quarts in volume), cover the pot, place it on the stove and bring the water to a boil over medium heat. Once boiling, without removing the lid, reduce the heat to low, stopping the boil, and continue cooking the rice for 15 minutes. Finally, reduce the heat to its lowest point and simmer the rice for 5 to 6 minutes. Turn off the heat completely. Let the rice rest, in the rice cooker, or pot, for 12 to 15 minutes before removing the lid.
Once rested, remove the lid, discard the konbu. Slide a moist rice paddle all the way down and around the pot. Turn the pot over and dump the cooked rice into a large, wooden bowl or non-reactive dish (be sure it's damp). Pour the Vinegar Dressing over the rice paddle onto the hot rice, moving the paddle around as you do so to spread out the Vinegar Dressing. Spend a minute or so spreading the hot rice out evenly over the bottom of the bowl. Now, begin gently turning over the hot, seasoned rice, fanning it as you go, to help as much steam escape as possible. As it cools, the rice takes on a lovely sheen. When fairly cool (about 2-3 minutes of turning and fanning), you're finished.
The sushi rice is ready to use when at room temperature. Never refrigerate prepared sushi rice or it will dry out. Always cover the rice with a damp, wrung-out towel and one more layer of dry towel. If it contains nothing perishable, leave it out in a cool place up to one day. Or, freeze the prepared rice in one cup flat-patty portions, sealed tightly in plastic wrap. Place them in freezer bags for extra protection. Perforate the plastic wrap, then microwave each portion about two minutes to refresh them. Use these frozen patties within two to three months.
Source: USA Rice Federation, from: Sushi for Dummies by Judi Strada and Mineko Takane Moreno
"Shrimp Finger Sushi (ebi no nigiri-zushi) is a beloved sushi bar staple. That's why we include it in the "Creating Sushi Bar Favorites at Home" Chapter of Sushi for Dummies.
If you're in a hurry and don't want to make sushi rice yourself, you can use the microwaveable, individually packaged versions of cooked Japanese (short-grained) rice labeled gohan. We've seen this precooked rice only in Asian markets, but it likely will be widely available soon. Simply follow the reheating directions on the package and then scale down the dressing to match the amount of rice you're making. The trick to pleasantly chewy, but not tough, boiled shrimp is boiling them just long enough to cook through, no more. Threading a skewer into the shrimp insures they cook straight."
1 cup prepared Sushi Rice (recipe follows)
8 jumbo shrimp
1/2 teaspoon Wasabi paste, or to taste
Special Sushi Tools 6- to 7-inch bamboo skewers
FOR SERVING:
Pickled ginger
Soy sauce
Prepare 8 finger sushi rice balls using the sushi rice. To do this, dip your hands in a bowl of vinegared water (4 tablespoons rice wine vinegar to 1 cup water), tap them on a damp towel to remove excess water, pick up and gently squeeze about 2 tablespoons sushi rice into a slender oval ball, about 2-inches long x 1-inch wide, using the palms and fingers of one hand, aided by the other hand if necessary. Gently press the bottom of the finger sushi with your thumb to give it a slightly humped look and place the finger sushi on a damp cutting board or plate. Continue making sushi rice balls for the eight finger sushi, rewetting your fingers as necessary and placing the sushi on the damp cutting board or plate. Set aside, covered, in a cool place.
Run a bamboo skewer through each shrimp from the head to the tail end, coming in just under the bottom shell. Cook them in boiling salted water about 3 minutes, just until cooked through. Immediately plunge them into ice water to stop the cooking. Drain and dry the shrimp. Twist the skewers out of the shrimp, and peel off the shells. Butterfly each shrimp from the head down to, but not through, the tail. Remove any dark vein, if present.
Dab wasabi paste, to taste, on the top of the rice balls. Drape a butterflied shrimp over the top of each sushi rice ball. Give them a finished look by laying a damp paper towel over the shrimp, gently pressing the shrimp and rice ball together. Serve with soy sauce and pickled ginger.
Makes 8 finger sushi
HOW TO MAKE SUSHI RICE
This sushi rice recipe is adapted from a recipe by Mineko Takane Moreno.
Makes 5 cups cooked and seasoned rice
Sushi rice takes about 1 1/2 hours to make, the majority of the time letting the rice soak or cook. If you're working the day you want to eat sushi, make the rice early in the morning, then set it aside until suppertime. Sushi rice is best eaten the day it's made, or it looses it's fresh, bright flavor.
You'll need a large, wide-mouthed and shallow non-reactive container like a wooden salad bowl to cool down and season the sushi rice in; a flat wooden rice paddle, or wooden spoon to turn over the hot rice; and a fan, or something stiff and flat, to fan off and help cool down the hot rice quickly. Important tip for last-minute sushi: Any sushi rice not eaten that day can be frozen in one cup flat-patty portions, sealed tightly in plastic wrap. Place them in freezer bags for extra protection. Perforate the plastic wrap, then microwave each portion about 2 minutes to refresh them. Use these frozen patties within 2 to 3 months.
FOR THE VINEGAR DRESSING:
1/4 cup rice vinegar
1 tablespoon sugar
1 1/2 teaspoons salt
FOR THE SUSHI RICE:
2 cups uncooked short or medium grain white rice (Arborio rice cooks up too creamy, long grain rice too dry for sushi)
2 cups water
1 (2- to 3- inch) square piece of dashi konbu (dried kelp), wiped with a damp cloth, cut a few times along the edges
1 tablespoons sake (rice wine)
TO MAKE THE VINEGAR DRESSING:
Before the rice is cooked, combine the ingredients for the Vinegar Dressing in a small bowl, stirring a minute or two until the salt and sugar dissolve. Set aside.
TO PREPARE THE SUSHI RICE:
Place the rice in a large bowl or pan. Cover the rice well with cold tap water. Gently swirl the rice around in the bowl 5 seconds or so using your hand. Wait a second or two until the rice settles down, then pour off the milky-colored water. (Never let the rice soak in this milky water or the rice will take on an off-flavor.) Rinse the rice again, in the same fashion, 3 or 4 more times, until the water is almost clear. Drain the rice a final time.
Combine the rinsed rice with 2 cups water in a rice cooker (don't plug it in yet) or a heavy pot. In either case, the water should be about 1/2-inch above the rice. (If your first batch of sushi rice made from a new bag of rice is a little dry, add 1/4 cup more water next time.) Let the rice soak for 30 minutes, then add the dashi konbu and sake. If using a rice cooker, plug it in and turn it on. The rice cooker will take it from there, turning off, or down, at the appropriate time. If using a heavy pot (at least 1 1/2 quarts in volume), cover the pot, place it on the stove and bring the water to a boil over medium heat. Once boiling, without removing the lid, reduce the heat to low, stopping the boil, and continue cooking the rice for 15 minutes. Finally, reduce the heat to its lowest point and simmer the rice for 5 to 6 minutes. Turn off the heat completely. Let the rice rest, in the rice cooker, or pot, for 12 to 15 minutes before removing the lid.
Once rested, remove the lid, discard the konbu. Slide a moist rice paddle all the way down and around the pot. Turn the pot over and dump the cooked rice into a large, wooden bowl or non-reactive dish (be sure it's damp). Pour the Vinegar Dressing over the rice paddle onto the hot rice, moving the paddle around as you do so to spread out the Vinegar Dressing. Spend a minute or so spreading the hot rice out evenly over the bottom of the bowl. Now, begin gently turning over the hot, seasoned rice, fanning it as you go, to help as much steam escape as possible. As it cools, the rice takes on a lovely sheen. When fairly cool (about 2-3 minutes of turning and fanning), you're finished.
The sushi rice is ready to use when at room temperature. Never refrigerate prepared sushi rice or it will dry out. Always cover the rice with a damp, wrung-out towel and one more layer of dry towel. If it contains nothing perishable, leave it out in a cool place up to one day. Or, freeze the prepared rice in one cup flat-patty portions, sealed tightly in plastic wrap. Place them in freezer bags for extra protection. Perforate the plastic wrap, then microwave each portion about two minutes to refresh them. Use these frozen patties within two to three months.
Source: USA Rice Federation, from: Sushi for Dummies by Judi Strada and Mineko Takane Moreno
MsgID: 3155826
Shared by: Betsy at Recipelink.com
In reply to: Recipe: A Zillion Recipes Using Rice - 06-24-14 ...
Board: Daily Recipe Swap at Recipelink.com
Shared by: Betsy at Recipelink.com
In reply to: Recipe: A Zillion Recipes Using Rice - 06-24-14 ...
Board: Daily Recipe Swap at Recipelink.com
- Read Replies (9)
- Post Reply
- Post New
- Save to Recipe Box
| Reviews and Replies: | |
| 1 | Recipe: A Zillion Recipes Using Rice - 06-24-14 Daily Recipe Swap |
| Betsy at Recipelink.com | |
| 2 | Recipe: Apple Brown Rice Stuffing (with almonds and raisins) |
| LazSwann | |
| 3 | Recipe(tried): Baked Stuffed Peppers (using brown rice and sunflower seeds, no meat) |
| LazSwann | |
| 4 | Recipe(tried): Cajun Red Beans and Rice (using miso) |
| LazSwann | |
| 5 | Recipe(tried): Chicken Jambalaya (using chicken thighs and drumsticks) |
| LazSwann | |
| 6 | Recipe(tried): Lemon Chicken and Rice |
| LazSwann | |
| 7 | Recipe(tried): Chicken with Spanish Rice (using chicken breasts and green beans) |
| LazSwann | |
| 8 | Recipe(tried): Stuffed Peppers (using Success Rice and ground beef or chicken) |
| LazSwann | |
| 9 | Recipe(tried): Chicken a La King (Success rice recipe, using cooked chicken, peas and mushrooms) |
| LazSwann | |
| 10 | Recipe: Shrimp Finger Sushi and How to Make Sushi Rice |
| Betsy at Recipelink.com | |
ADVERTISEMENT
Random Recipes from:
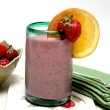
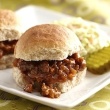
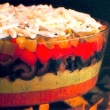
Appetizers and Snacks
Appetizers and Snacks
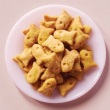
- Candied Popcorn (using Jello)
- Queso Fundido
- Peanut Butter Roll-Ups
- Finger Drumsticks (1972)
- Chicken Mousse (using lemon Jell-O)
- Cream Cheese Dip with Garlic and Onion - Thank you, this is VERY close!
- Chinese Pork Appetizers
- Pecan Blue Cheese Crackers
- Cheese Sticks
- Savory or Sweet Napoleon Sandwiches
UPLOAD AN IMAGE
Allowed file types: .gif .png .jpg .jpeg
Allowed file types: .gif .png .jpg .jpeg
POST A REPLY
Post a Request - Answer a Question
Share a Recipe
Thank You To All Who Contribute
Post a Request - Answer a Question
Share a Recipe
Thank You To All Who Contribute
POST A NEW MESSAGE
Post a Request - Answer a Question
Share a Recipe
Thank You To All Who Contribute
Post a Request - Answer a Question
Share a Recipe
Thank You To All Who Contribute